Best EVER Brownies

Hello everyone and welcome,

Today I’m going to share my Best Ever Brownie recipe with you. If you wanna take your brownies up a notch….you’re going to love this recipe. It’s rich-chocolatey-fudgy-nutrient rich, goodness.

So a few weeks back I’m in my local organic market and I stumble upon fermented cacao. I flip the bag over and read the ingredients and nutrient content and it was at this moment I fell in love.

What’s not to love it’s fermented, my latest obsession, it’s chocolate which has always been an obsession, it’s packed full of nutrients and no toxic chemicals, my forever obsessions. After using this cacao I just can’t go back to cacao that’s not fermented. This richness and taste are incredible.

Now with all that being said….let’s get into the reason your here…..the recipe.

Ingredients:

1 1/4 C organic coconut palm sugar
1/2 C organic grass-fed melted butter ( coconut oil as a vegan option)
2 organic eggs ( or vegan alternatives of choice)

1/3 C organic fermented cacao powder
1/2 C organic sprouted spelt flour
1/4 tsp pink Himalayan salt
1/2 tsp baking powder
1 tsp organic moringa leaf powder (optional)

Method:

  1. Preheat oven to 350°.
  2. Oil or butter and flour brownie pan.
  3. Mix eggs and sugar until nice and fluffy. Next add butter, mix to incorporate. Sift in flour, cacao, salt, baking powder and moringa leaf powder, mix until smooth.
  4. Add brownie batter to greased and floured brownie pan. Bake @350° for 25-30 minutes.

Let cool and enjoy!

Now let’s talk about all the nutrient goodness of this recipe. The cacao is loaded with nutrient goodness such as potassium, magnesium, calcium, iron, and has a deeper, richer chocolate flavor.

I like to add different herbs to my desserts just to give it added nutrients without my family being able to detect the taste and it works wonderfully.

Here are just some of the benefits of moringa leaves.

Now that I’ve shared my Best EVER Brownie recipe with you, I hope you will give this recipe a try and enjoy it as much as my family and I do.

Thank you so much for taking the time to stop by, I greatly appreciate it.

Instagram // Pinterest // Twitter

Until Next Time,

Sewloveable

Cheesy Chive & Goat Milk Biscuits

Hello everyone and welcome,


Today, I wanted to try my hand at making a nice, cheesy and savory biscuits. Now when I told my friend about using goat’s milk in the recipe……she immediately let me know her displeasure for goats milk. I was even discouraged by the sales clerk from buying it. I had and idea in my mind and I wanted to try it out and see for myself. Thank goodness I listened to my own inner voice because these biscuits were delicious. My family devoured them and I was in total surprise because they’re some seriously picky individuals.  Trying new things with them can be a bit of a challenge but I try in spite of the challenges.


Since the recipe was such a success I had to share it with you. So let’s just dive right in shall we.


Ingredients:

  • 2 cups organic spelt flour
  • 2 teaspoons baking powder
  • 1/2 teaspoon baking soda
  • 1/2 teaspoon organic garlic powder
  • 1/2 teaspoon organic onion powder
  • 1/4 teaspoon pink Himalayan salt
  • 4 tablespoons (frozen) unsalted grass-fed or organic butter, cut into small cubes
  • 6 ounces sharp white cheddar, shredded or cut into tiny pieces ( or cheese of choice)
  • 1 cup goat milk ( I used one tablespoon of goat milk powder mixed in 1 cup water.)
  • 1/4 cup chopped organic chives
  • 1/4 cup organic dried parsley
  • Method:
  1. Preheat oven to 425°F degrees. Line two baking sheets with parchment.

  2. In a large bowl, whisk together flour, baking powder, baking soda, garlic powder, onion powder, and salt. Using a spatula fold the butter into flour mixture until butter is incorporated throughout. Stir in cheese, parsley, and chives until everything is evenly distributed. Then add goat milk and stir just until dough comes together.

  3. Using ice cream scoop, drop dough onto prepared baking sheets and space 2 inches apart.

  4. Bake in the oven until golden brown, about 12-14 minutes, rotating baking sheets once.


I hope you will give this recipe a try and enjoy it as much as we do.

Thank you so much for taking the time to stop by, I greatly appreciate it!

Twitter // Instagram // Pinterest

Until Next Time,

Sewloveable

Blackstrap Molasses Natural Cures

Hello everyone and welcome,

Are you looking for simple and easy ways to get more nutrients in your daily regimen?  Organic Unsulphured Blackstrap Molasses may just be a simple solution to help. I stumbled upon a great article that gives you all the in’s and out’s on Blackstrap Molasses. It even offers helpful suggestions that may benefit those with diabetes.

I hope you find this information just as beneficial as I have.

Adding 1 Tbsp of Organic Unsulphured Blackstrap Molasses has been a great way for me to naturally increase my potassium intake. I really struggle trying to get 4,700 Mg of potassium, which is the daily recommended value.

Depending on the brand you buy molasses can have anywhere from 110-730 Mg in just 1 tablespoon. Not to mention all of its many other nutrients and benefits which you can find out more about below.

https://www.earthclinic.com/remedies/molasses.html

Thank you so much for taking the time to stop by, I greatly appreciate it.


Instagram // Pinterest // Twitter


Enjoy & Until Next Time,


Sewloveable

Vegan Carrot Cake

Hello everyone and welcome,

I decided to try my hand at making my favorite dessert Carrot Cake. I tried my hand at Carrot Cake a few years ago……it did not go well. In fact, after it baked, cooled and was taste tested it went right into the garbage.  So, today I set out to redeem myself. I can’t have my daughter’s teasing me about my 1st Carrot Cake fail forever….LOL.

Since I am trying to cut back on traditional wheat and use more ancient grains like Spelt I thought I would try using it in Carrot cake. I love how light this flour is. It’s still wheat….just a different type.

Spelt has not been manipulated to meet manufacturing needs. Spelt is one of the oldest cultivated grains tracing is roots more than 6,000 years back to ancient Mesopotamia. Spelt has kept many of its original characteristics which provide an impressive nutritional profile, along with ease of digestibility leading to anti-inflammatory qualities. For more information check out the source I referenced here.

This recipe is very versatile. You can make a cake, loaf or muffins. Top with icing, powdered sugar, streusel topping, or no topping at all. Having options is a great thing!

Alright…..let’s dive right into the recipe.
Ingredients:

2 C organic Spelt Flour or AP

2  1/2 C organic shredded carrots

1 C organic unsweetened applesauce

1  1/4 C organic cane sugar

1/2 C avocado oil ( or oil of choice)

1/2 C organic raisin

1  1/2 tsp baking powder

1 tsp baking soda

2 tsp organic cinnamon powder

1 tsp organic nutmeg

1/2 tsp organic ground clove

1/2 tsp organic ground ginger

1/4 tsp Pink Himalayan salt

2 tsp organic vanilla extract

Streusel Topping (optional)

1/ 4 C organic spelt flour ( or AP)

1/3 C organic brown sugar (DIY HERE)

1/4 tsp organic nutmeg

1/2 tsp organic cinnamon

3 tsp organic vegetable shortening

Combine everything together to get at nice crumbled streusel topping.

Method:

  1. Preheat oven to 350F and lightly grease a 9-inch cake, loaf or muffin pan.
  2. Mix together the (dry ingredients) flour, baking powder, baking soda, salt, cinnamon, nutmeg, clove, and ginger.
  3. In a separate bowl mix together (wet ingredients) applesauce, sugar and vanilla extract.
  4. Add in the wet ingredients to the dry and mix until just combined. Fold in the carrots and raisins.
  5. Sprinkle your streusel topping across the top Bake 9-inch cake 35-45 minutes, loaf pan 1hr-1hr 15 minutes, and muffins 20-25 minutes or until a toothpick inserted in the center comes out clean. Let it rest for about 10 minutes before removing the from the pan.


Oh and yes…..I did redeem myself. Now my daughters can leave their jokes in the past, this recipe was truly a winner.

I hope you will give this recipe a try and enjoy it as much as my family and I do.

Thank you so much for taking the time to stop by, I greatly appreciate it.

Instagram // Pinterest // Twitter

Enjoy & Until Next Time,

Sewloveable

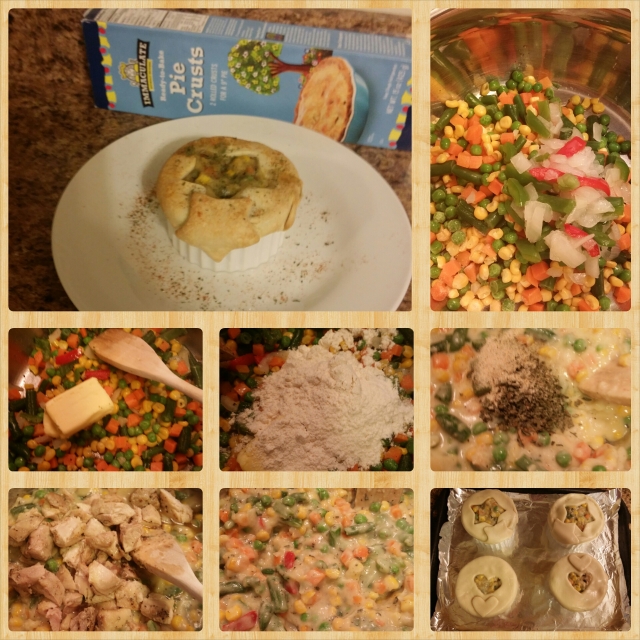
Easy Individual Chicken Pot Pie

Hello Everyone and Welcome,


image

I have decided to try and share more recipes that are easy for our busy lives. There is nothing like a quick, easy and tasty home cooked meal.  My craving for comfort food is what prompted me to experiment with this dish. Since this dish got the family seal of  approval. I had to share. So let’s dive into this recipe.

This recipe serves 4

Ingredients:

2 Boneless organic Chicken Breast

1 Pie Crust

1 (12 oz.) Bag of Organic Mix Vegetables

1/2 C Organic Frozen Onions & Peppers

2 tsp of grape seed oil ( or oil of choice)

4 TBS of Butter

1/2 C  organic Flour

1 1/2 C organic Chicken Stock ( try my DIY Version here)

Seasonings ( Pink Himalayan Salt, Black Pepper, Onion Powder, Garlic Powder, Basil, Thyme)

Directions:

Preheat oven to 425°

Season your chicken on both sides with (salt, pepper, onion powder, garlic powder)

Place on a parchment lined baking sheet. Cover with foil and bake for 20 minutes or until cooked through. Once done dice into bite size chunks and set aside.

In a pot on medium heat add oil, mixed veggies, peppers and onions and (pinch of salt, 1/4 tsp of black pepper, onion, and garlic powder.) Cook/Stir until just tender.  Now add butter, flour, and chicken broth. Stir to evenly incorporate.  Next add ( pinch of salt, 1/2 tsp of black pepper, basil, thyme, basil & garlic powder.) Stir to evenly distribute. Remove from the heat and add your chicken.  Mix to evenly distribute.

Once your mixture has cooled a bit……about 5 minutes.  It’s time to add it into your ramekins.  Once you have your ramekins filled it’s time to top with your pie crust.

Take a bowl a little larger than your ramekins and use it to cut out four pot pie crust.

* This is optional use a small cookie cutter in the center of your pot pie crust and make a cut-out.

Or simply score the pie crust after you place them on top of your ramekins.

Bake in the oven for 20-25 minutes at 375° turning half way through the cooking cycle.

image

We really love this dish in my household and I hope you and your family will too!

Thank you so much for taking the time to stop by, I greatly appreciate it.

Instagram // Pinterest // Twitter

Enjoy & Until Next Time,

Sewloveable

Quick & Easy Summer Drink Strawberry Watermelon Limeade (Only 5 ingredients + All Organic)

Hello everyone and welcome to………..


wpid-textgram_1446521642.png

I’ve really been enjoying the summer fruits of the season. So today I decided to share a quick and easy summer drink that is really refreshing and delicious.

Here’s what you’ll need……….

Ingredients:

  • 4 cups organic watermelon diced, seedless
  • 4 cups organic strawberries frozen
  • 1/2 cup of water
  • 2 tablespoons organic lime juice
  • 2 teaspoons organic cane sugar or honey

Instructions:

  1. Add all the ingredients into your blender. Blend until smooth, about 30 seconds to 1 minute. Now it’s time to enjoy!

    You can use this recipe to make popsicles just pour the mixture into the popsicle molds and freeze or add a little libation for a great summer cocktail.

    This recipe serves 4

    I hope that you will enjoy this recipe as much as my family and I do.

    Thank you so much for taking the time to stop by, I greatly appreciate it.

    Instagram // Pinterest // Twitter

    Until Next Time,

    Sewloveable


Warm Citrus Quinoa Sweet Potato & Kale Salad

Hello everyone,

Welcome to……..

wpid-textgram_1446521642.png

I was looking to try out something light, yet filling. I’d been craving something with savory and citrus flavors. Since this craving would not leave my mind I had to get in the kitchen and create something to remedy it. Now you all know that my kid’s are SUPER PICKY…..so who know’s how this is going to go over with them. But hey every now and again I deserve for it to be about ME and my taste buds.

With that being said………let’s dive in.

(*This post contains affiliate links, which means I may receive compensation if you make a purchase using the links.)

Ingredients

  • 1 large organic sweet potato
  • 1 cup organic quinoa
  • 1 tablespoon avocado oil
  • 1/2 teaspoons organic garlic powder, onion powder and black pepper
  • Juice of 2 organic limes
  • 3 teaspoons liquid amino
  • 2 cups of organic kale (cut into bite size pieces)

Method

  1. Preheat the oven to 425 degrees F. Line a baking sheet with parchment paper ( I am all about easy clean up.)
  2. Peel and chop the sweet potato in small, bite-sized pieces. Drizzle a teaspoon of your oil over the sweet potatoes. Toss to coat. Place your sweet potatoes on your baking sheet and roast for 20 – 25 minutes until tender, stirring half way through so as not to burn them.
  3. While my sweet potatoes are cooking, cook your quinoa according to package instructions.
  4. Once your sweet potatoes and quinoa are done just set aside and allow them to cool while we continue on.
  5. In a skillet over medium heat add your remaining oil, then kale, seasonings, and liquid amino. You’re going to sautee for 3-5 minutes until your kale is tender and fully incorporated with all your flavor’s.
  6. In a large bowl add your quinoa, kale, sweet potatoes, and lime juice. Gently toss to get everything evenly mixed and fully incorporated with all the flavor’s.

This recipe was surprisingly a big hit with my kid’s……who used say that they don’t like quinoa or sweet potatoes. Until now that is. I think it’s the savory and citrus flavor’s together that won them over. Whatever the reason I’m just happy that those picky taste buds enjoyed this as much as I did.

This recipe serves 4

image

I hope you will give this recipe a try and enjoy it as much we did.

Thank you so much for taking the time to stop by, I greatly appreciate it.

Instagram // Pinterest // Twitter

Until Next Time,

Sewloveable

Vegan Pad Thai

Hello everyone,

Welcome to……….

wpid-textgram_1446521642.png

I have been wanting to make Pad Thai for sooooooo long. I have to admit I was intimidated by the dish. So here’s how I overcame my intimidation…..a buddy of mine told me about a Pad Thai that he made after hearing him say how easy it was……I knew for sure I could do it. It was kind of one of those moments of if he could do it I can definitely do it better. So that is exactly what I set out to do…lol!

So let’s dive in and get started…….

(*This post contains affiliate links, which means I may receive compensation if you make a purchase using the links.)

Pad Thai 

  • 8 ounces organic brown rice Pad Thai noodles
  • 2  organic zucchini’s (sliced)
  • 1/2 cup organic tri- colored peppers (sliced)
  • half of a medium organic white onion (sliced)
  • 1/2 cup organic mushrooms (sliced)
  • 1 tablespoons avocado oil (or oil of choice)
  • 1 cup peanuts, chopped
  • 2 cups organic bean sprouts
  • ½ cup fresh organic spinach and green onions (chopped)

Pad Thai Sauce

  • 3 tablespoon liquid aminos
  • 1 tablespoon sriracha
  • 2 tablespoons organic lime juice
  • 1 tablespoons avocado oil
  • 1 tablespoon organic toasted sesame oil
  • 2 tablespoons organic brown sugar ( DIY here )
  • 1 tablespoon organic cane sugar
  • 2 tablespoon organic peanut butter
  • 1/2 tsp organic garlic, ginger, and onion powder

Method

  1. Cook your noodles according to package instructions and set aside.
  2. Whisk together all of the ingredients for your sauce and set aside.
  3. In a wok or large and deep non-stick skillet over medium-high heat, add your oil.
  4. Add mushrooms, bell peppers, onions, zucchini and saute 1 – 2 minutes then add spinach, and bean sprouts saute 1 minute longer.
  5. Add in noodles and sauce and toss everything together and cook 1 – 2 minutes.
  6. Serve warm topped with green onions and  peanuts.

This dish serves 4

image


I hope that you will give this recipe a try and enjoy it as much as my family and I do!

Thank you so much for taking the time to stop by, I greatly appreciate it.

Instagram // Pinterest // Twitter

Until Next Time,

Sewloveable


Organic Green Onion and Chive Corn Fritters

Hello everyone,

Welcome to…….

wpid-textgram_1446521642.png

I was looking to try something new for breakfast. Sometimes you just get tired of the same old thing. Since my taste buds were craving something a little sweet and savory I decide to give corn fritters a try. Boy oh boy, these were some kind of good. The flavors took me back in time to my childhood. Back to when my parents would take my brother and I, to Chesapeake Bay Seafood House. They served the best seafood and hush puppies and these fritters were very reminiscent of those delicious hush puppies.

Let’s get started so you can taste for yourself…….

(*This post contains affiliate links, which means I may receive compensation if you make a purchase using the links.)

INGREDIENTS:

  • 3 Tablespoons avocado oil (or oil of choice)
  • 1 cup organic medium ground yellow corn meal
  • 1/2 cup organic amaranth flour  (all purpose will work also)
  • 1 Tablespoons baking powder
  • 1/4 cup unsweetened applesauce
  • 4 Tablespoons organic cane sugar
  • 1/2 teaspoon sea salt
  • 1 cup organic non-dairy milk of your choice
  • 2 teaspoon organic white distilled vinegar
  • 1/4 cup organic corn (optional)
  • 1/4 cup organic green onion
  • 1/4 cup organic green chives

METHOD:

  1. Place the dry ingredients in a bowl and whisk together.
  2. Add the vinegar to your non-dairy milk and mix.
  3. Add the oil, non-dairy milk mixture and applesauce to your dry ingredients and stir to combine.  Next, add the corn, green onion, and chives a mix to evenly distribute. Let the batter sit for 2-3 minutes so that the batter puffs up from the baking powder.
  4. Place some oil in a frying pan and heat over medium heat. Once the oil heats, spoon 1/4 cup of batter into the pan.
  5. Cook the fritters for about 3-5 minutes on each side. It’s time to flip them when the edges look done and there are some bubbles in the middle. Repeat until all the batter is gone.image

I hope that you will give this recipe a try and enjoy it as much as my family and I have.

image

Thank you so much for taking the time to stop by, I greatly appreciate it.

Instagram // Pinterest // Twitter

Until Next Time,

Sewloveable


Jumbo Vegan Ginger Molasses Cookies

Hello everyone,

Welcome to…………

wpid-textgram_1446521642.png

This recipe was inspired by my mother. She shared a story from her childhood with me about her and her older sister. They would each get 10 cents as allowance money from their parents. She said that from time to time they would get 25 cents and when they did they would feel like the riches, girls in the world.

They would take their allowance money and head to the local country store and treat themselves to Ginger and Molasses cookies which were 2 for 1 cent, a soda, and peanuts. Walk down the road and sit on the steps outside the church they attended and enjoy their treats all to themselves. I love the way my mom lit up as she told me that sweet little story.

So, I decided to try and replicate one of her favorite childhood special treats with my own little twist!

Let’s dive into the recipe…..

(*This post contains affiliate links, which means I may receive compensation if you make a purchase using the links.)

Ingredients:

2  1/4 C organic all-purpose flour

2 tsp baking soda

1/4 tsp pink Himalayan sea salt

1 tsp organic cinnamon

1 tsp organic clove

1 tsp organic ground ginger

6 Tbsp organic vegetable shortening

1 C firmly packed organic brown sugar (DIY recipe here)

1/4 C organic cane sugar

1/4 C organic un-sulphured blackstrap molasses

1/2 C organic applesauce

Method:

This recipe yields 12 jumbo cookies.

  1. Line a baking sheet with parchment paper.
  2. Preheat oven to 350°
  3. In a medium bowl combine flour, salt, baking soda, ginger, clove and cinnamon. (Set aside for now.)
  4. In a large bowl and using a hand or stand mixer cream together shortening, sugars, applesauce, and molasses. Mix until smooth and combined.
  5. Add your flour mixture a little at a time. Use your mixer on the lowest speed to combine. Repeat until all of the flour mixture is evenly combined and your dough is formed.
  6. Using an ice cream scoop, scoop your dough onto your cookie sheet. Space them 2″ apart. Press the cookies slightly using the back of your ice cream scoop. *Optional you can sprinkle a little cane sugar.
  7. Bake for 12 to 15 minutes.  Allow them to cool for 5 minutes on the baking sheet, then transfer to a wire cooling rack to completely cool for an additional 10- 15 minutes.

image

image

Now it’s time to enjoy your labor of love!

Thank you so much for taking the time to stop by, I greatly appreciate it.

Instagram // Pinterest // Twitter

Until Next Time,

Sewloveable